CREDITS:
CONCEPT/ IDEA :
KEVIN, LUCAS AND DARREN
TREATMENT:
KEVIN (CHARACTER REFERENCES, CHARACTER SYNOPSIS)
DARREN(CHARACTER SHEET, DYNAMIC POSES/COLOR SWATCHES/RIGGING REEL)
LUCAS (TURNTABLE)
SHOOTING:
KEVIN, LUCAS AND DARREN
HDRI:
LUCAS, KEVIN
MODELLING:
HEAD - KEVIN (INITIAL BASE MESH),DARREN (CLEANUP/POLISH)
TORSO - DARREN(CONCEPT), LUCAS (CLEANUP/POLISH)
UPPER ARM - KEVIN (INITIAL BASE AND CONCEPT MESH), DARREN (ELBOW HINGE JOINTS SYSTEM AND CONCEPT/CLEANUP/POLISH/)
LOWER ARM - LUCAS (INITIAL BASE AND CONCEPT MESH), DARREN (CLEANUP/POLISH)
UPPER LEG - LUCAS (INITIAL BASE AND CONCEPT MESH), KEVIN (DETAILING/PLATINGS), DARREN (CLEANUP/POLISH)
LOWER LEG + PELVIS - LUCAS (INITIAL BASE AND CONCEPT MESH), KEVIN (DETAILING/PLATINGS), DARREN (CLEANUP/POLISH)
UVS:
HEAD - KEVIN
TORSO/UPPER ARM/LOWER ARM - LUCAS
UPPER LEG/ LOWER LEG - KEV
TEXTURING:
HEAD - KEVIN
UPPER TORSO- KEVIN
UPPER ARM/LOWER ARM/LOWER TORSO/DONUTS/BOLTS - LUKE
UPPER LEG/LOWER LEG+PELVIS - KEVIN
MATCHMOVE AND TECHNICAL APPROACH:
LUCAS - OVERHEAD SHOT AS ROBOT WALKS/ KEVIN GOT SHOT/OL SPRAY BEING TAKEN OUT
KEVIN - LIFT SCENE/FOOT SCENE/ ROBO ALERTED/FOCUS FIRE/FIRST GUN TRANSFORMATION/ROBO MALFUNCTION/FINAL SHOT/KEVIN PREPARING TO RUN
RIGGING:
DARREN
ANIMATION:
LUCAS - FIRST GUN TRANSFORMATION/KEVIN GOT SHOT/OL SPRAY IS BEING TAKEN OUT
DARREN - OVERHEAD SHOT/ROBOT MALFUNCTION/ROBOT TURN TO SHOOT/ KEVIN PREPARING TO RUN BEHIND THE WALL
KEVIN - LIFT SCENE/FOOT SCENE/ROBOT GETS ALERTED/FOCUS FIRE/FINAL SHOT
LIGHTING AND RENDERING/LOOK DEV'T:
LUCAS AND KEVIN
COMPOSITING:
KEVIN
SOUND DESIGN:
LUCAS - REASEARCH AND DEVELOPMENT
KEVIN - COMPOSING AND EDITING SOUND FX
Showing posts with label Technical Journal. Show all posts
Showing posts with label Technical Journal. Show all posts
Thursday, 24 April 2014

Monday, 21 April 2014
FINAL COMPOSITING AND SOUND EDITING
FINAL COMPOSITING
It has been quite a tough few days in compositing as we have twelve shots to finish and most of them requires loads of vfx.LIFT SCENE
First of all this lift scene is a complete remake that I did using 2D layers because of the lack of tracking data as it opens.


How to do it:
Click on the imported item and press (Ctrl+Alt+G) and it will bring you to this box.

LENS BURST AND FLARE

USING 2 solids

2. make another white solid, this for the highlight of the flare later


FOOT SCENE SPECULAR BREAKDOWN


1. I made a copy of the BG layer and cone stamped it mimic the the normal floor without any specular


MUZZLE FLASHES

 |
| 1. First track the muzzle using afterfx tracking tools, target it to the null and then parent your muzzle flash in it! |
 |
| 2. After adjusting and tweaking your muzzle flash, duplicate it and scale it big and set Overlay as the transfer mode. Blur it. The reason for this is to set the lighting the area in sync with the flash. (illuminating) |
 |
| 3. For the other scene, I kept the scaled and blurred muzzle flash on the left side to show continuity |
 |
| 4. Apply the muzzle flashes you made, Ctrl+Shift+C it to Precompose and just duplicate it here but make sure it's out of sync from the muzzle flashes on the left! |
 |
| 5. Same goes for the Robot, explore on different stock footages you have and composite but make sure you credit in the end. |
 |
| 1. Adjust and be creative on masking and timing of the blood as it squirts upon hit. |
 |
| 2. Make sure it's placed of where it should be, you might need to let it stay on the same spot as the man falls. |

SOUND FX


Another step I explored is the panning of the L R of the sound. This is about how the sound travels from your left ear to fair then to the right ear. I did this visually, to show an extended depth of just what you see or say that you are the camera; you are standing quite far in different cuts, which sound is dominant on your left ear? is it the gun fire? or the robot's mechanical turns? these are the things I considered to make it believable.
Friday, 11 April 2014
NEW AND FINAL CONCEPT DEVELOPMENT PART 2
CONCEPT DEVELOPMENT PART 2...
Unfortunately! Bad News! The Butler Mech idea seems to be scrapped cause of lack of surprises and wit. But we are tasked to keep the robot and the action. We kept the idea of the robot but now the twist is that we are selling a spray.
We went on to a story of a robot same features as of your body guard. However, in the middle of the action he faces a problem with his arm bolts! They are stuck! This is because of the rust build up on them. Therefore we have this product that oils it that acts as a grease to smoothen it out and go on with the motion.
At the beginning we have no clue what the product is or what we are leading in to, it's a surprise. Kinda boring though for just an arm to get stuck to kill villains... We came up with this idea of a hand that transforms to a gun!
INTRODUCING:

OL - German for oil
Basically Designed like a retro/vintage spray cans to unstuck every bolts for your mechs!
SETTING: CARPARK B1
ACTORS AND STUNTMEN: KEV, ADITYA, STEVEN
SPECIAL THANKS TO ADITYA FOR THE PROPS!
the concept for the Robo was sort of altered and we got no clue on how to start all over again to not make it so sleek but since we're stuck and punny, I shot animatics in the carpark with my group and compiled them.
1ST ANIMATIC VERSION
We have a lot of animatic adjustments and reached up to 4, let me show it too
4TH ROUGH ANIMATIC
FOR THE RECONCEPTUALIZATION, I CHOSE ANOTHER THUMBNAIL THAT WILL BE THE BASE OF MY HEAD

I sculpted a new base head mesh in brush and let darren refine it in maya as a quad drawn model.
AFTER redefining the look of the robot, We assembled it all and here we got the final concept.

Let's head on to texturing!
EARLY CONCEPT RENDERS OF BUTLER MECH - ADDITION BEFORE CHANGE OF CONCEPT
EARLY CONCEPT RENDERS OF BUTLER MECH
This is the very early stage of our Robot Model, After assembly, I did different renders of them.
Kev -Head + Arms
Darren - Torso
Luke - Pelvis to Legs


CONCEPT DEVELOPMENT FOR THE ROBO AND TECHNICAL MODELING PROBS
CONCEPT DEVELOPMENT - 3D Stage
Here are some concepts that I made over time on the early stages of our robo model. I started off with the Head!
before I forget! this is the arm sketch concept I did to have a little hint of how it would look like!


 First of all as a start, I was asked to change the initial head model to actually make the edges flow nicely. Comparing from the old model, the basic head visor is just so rigid with crazy edge flow causing a very bad curvature when smoothed. Therefore as a solution, retopologized it to have a better smoothed surface.
 Another comment was that make the neck donut like, like robocop's which is quite contrast to my gear like concept cause I think the gears doesn't suit the model, it's very aggressive and leash like.

 Problem with this head model of mine is that the gaps of the plating are so evident after inspection. So I have to start all over again by choosing another head base mesh from my concept thumbnails.

LASTLY, for the neck pistons, here's the mechanism I made. In the end we scrapped it too to just two pistons in front, aim constrained to the inner chin piece in which you'll see in the final model!


this is the head concept, using zbrush z topology method. I came up with these head piece consisted of different layers of plating for the head
Modeled a dummy arm for us to brainstorm and improve. It has a slot pack for the gun.
LUKE MADE THE FIRST EVER GUN TRANSFORMATION FOR THIS, here's playblast
WE PROGRESSED on by the doing the different parts, I tried this mechanism in the neck for pistons referencing from Fausto's Robocop Models, check his works they're very awesome!
First of all as a start, I was asked to change the initial head model to actually make the edges flow nicely. Comparing from the old model, the basic head visor is just so rigid with crazy edge flow causing a very bad curvature when smoothed. Therefore as a solution, retopologized it to have a better smoothed surface.Another comment was that make the neck donut like, like robocop's which is quite contrast to my gear like concept cause I think the gears doesn't suit the model, it's very aggressive and leash like.LASTLY, for the neck pistons, here's the mechanism I made. In the end we scrapped it too to just two pistons in front, aim constrained to the inner chin piece in which you'll see in the final model!
the whole big base gear is rotatable, the small piece that holds the piston is rotatable as well and a hinge like bolt for the pistons to swing back and forth whenever the neck is moving.
OVERLOOKED PROBLEMS FACED//NOTE: When constraining, dont freeze transform the model as the it takes away the pivot for aiming.
CYLINDERS are CYLINDERS always scale uniformly!
BUTLER MECH CONCEPT DEVELOPMENT - 2D AND PRESENTATIONS P1
CONCEPT DEVELOPMENT - 2D AND PRESENTATIONS
THIS IS A PRESENTATION I DID FOR THE FINALIZE CONCEPT OF THIS BUTLER MECH WE ARE MAKING!
HERE ARE SOME CONCEPT IDEAS INCLUDED


MADE THE STORYBOARD FOR THE BUTLER MECH IDEA
Tuesday, 1 April 2014
UVS AND TEXTURES TECHNICAL JOURNAL
UV ARRANGEMENTS
Arranging the uvs for the robot is quite challenging cause there are a lot of parts involved.
Firstly I just unwrapped them (for my case its head) to be on different UV tile spaces
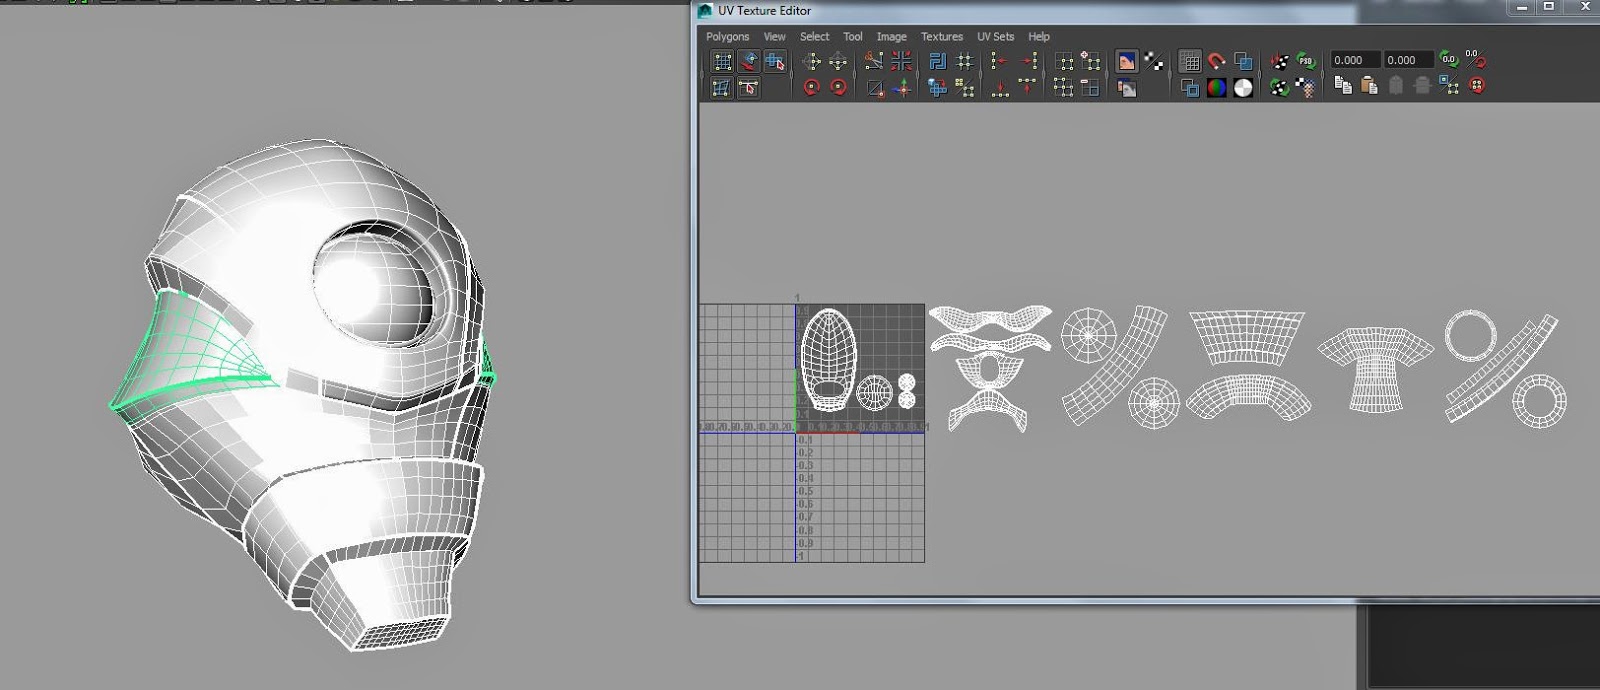
Then after that we decided on one tile space so we have to group the robots in parts:
- group by MIA
- group by parts
before I initiated the change, I tried to adjust the layout option to see how Maya arranges all the UVS on a designated tile space
 Here as the settings I tweaked for this case. You might want to check the Layout Settings more, cause I set it to Uniform especially for scale to have them equal sizes.
I found it a very messy way cause it locks me out of the freedom to place my UVS as it plays a vital role in texture placements later.
NORMALS FLIPPED:
It's a very redundant mistake to have it around but since while doing texturing, there's still room to fix and adjust it. It might be a cliche mistake, we should still always make sure we do it right


UV FOR THE LEGS:
 Remember to always make the UV sizes the same! That's one of the problems we faced in texturing. Since I'm doing the leg, I'll show you how I arranged all the parts of it for a clean and neat UVs.
This is the first layout I made before we assemble everything later. This is just for me to work easily on the UVS by grouping them first on their polygonal parts.
I believe this is a quick easy step cause later when we decide to change the overall scales of our UVS, it's going to be faster to adjust here and there.
Here are some pictures I took of my Outliner and my leg parts.
 in this case for the foot, I let it remain like this cause we have a hero shot of this. There's individual focus on this later on.


 IN THE END OF IT ALL, THIS STEP IS MY PERSONAL preference at an early stage, hope it helps!
Arranging the uvs for the robot is quite challenging cause there are a lot of parts involved.
Firstly I just unwrapped them (for my case its head) to be on different UV tile spaces
Then after that we decided on one tile space so we have to group the robots in parts:
- group by MIA
- group by parts
before I initiated the change, I tried to adjust the layout option to see how Maya arranges all the UVS on a designated tile space
I found it a very messy way cause it locks me out of the freedom to place my UVS as it plays a vital role in texture placements later.
NORMALS FLIPPED:
It's a very redundant mistake to have it around but since while doing texturing, there's still room to fix and adjust it. It might be a cliche mistake, we should still always make sure we do it right
UV FOR THE LEGS:
This is the first layout I made before we assemble everything later. This is just for me to work easily on the UVS by grouping them first on their polygonal parts.
I believe this is a quick easy step cause later when we decide to change the overall scales of our UVS, it's going to be faster to adjust here and there.
Here are some pictures I took of my Outliner and my leg parts.
Subscribe to:
Posts (Atom)